
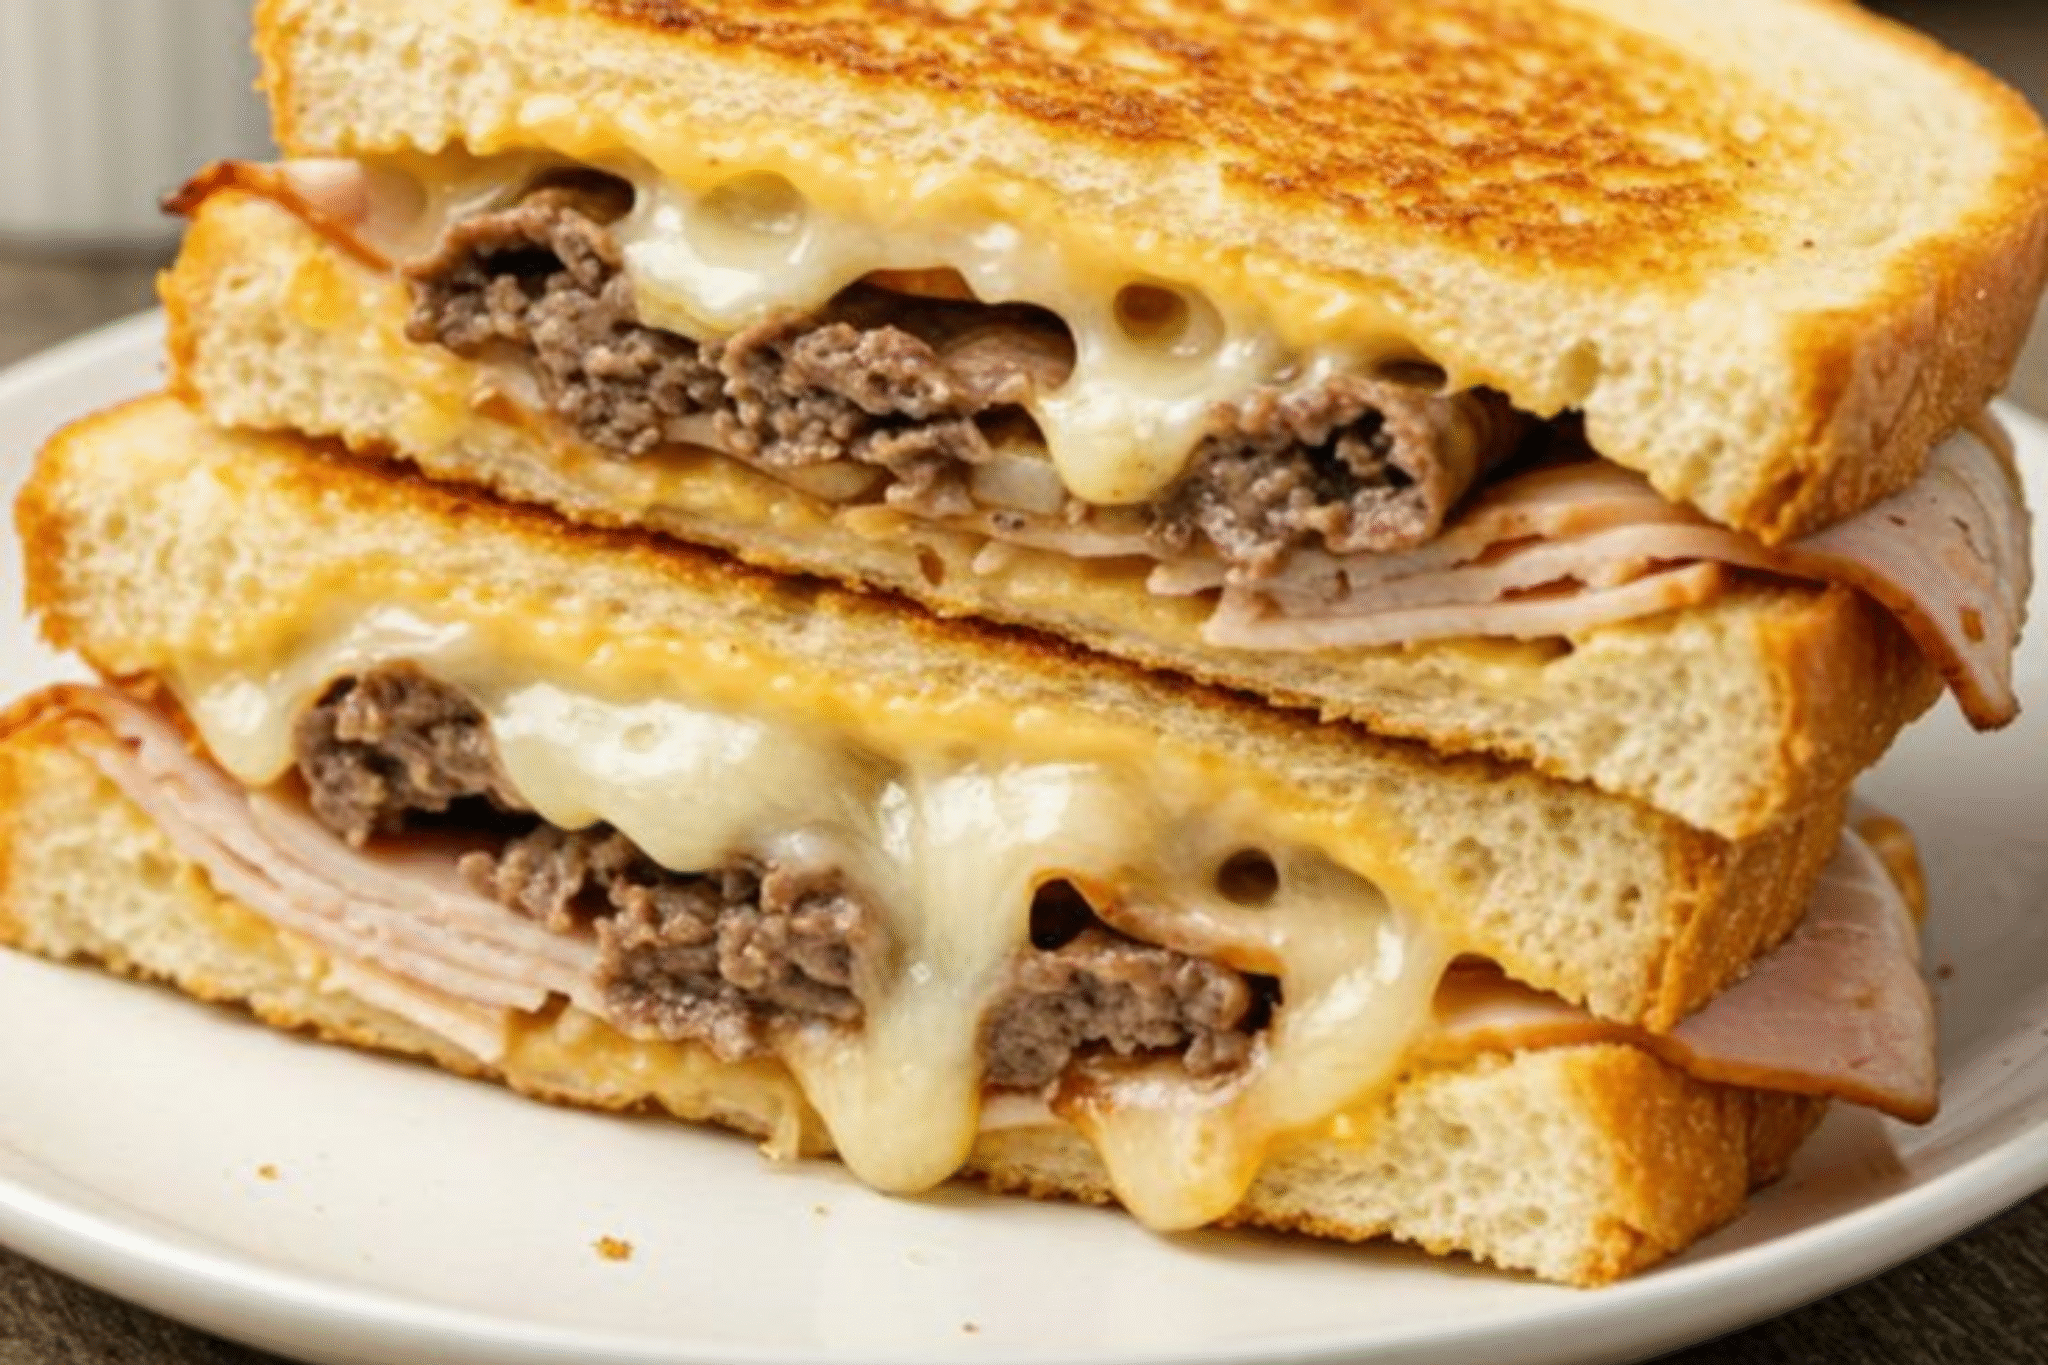
The Ultimate Cheddar Beef Turkey Melt: A Comfort Food Dream Come True!
Oh, my dears, get ready to experience a sandwich sensation that will redefine your comfort food cravings! This incredible Cheddar Beef Turkey Melt isn’t just a sandwich; it’s a warm, savory hug between two slices of perfectly toasted bread. Imagine succulent roast beef and tender turkey, layered with sharp, melty cheddar, all grilled to golden perfection.
Why You Will Absolutely Adore This Cheddar Beef Turkey Melt
- Unbeatable Flavor: The combination of savory roast beef, lean turkey, and sharp cheddar creates a symphony of tastes that’s truly irresistible.
- Perfectly Toasted Crunch: Each bite delivers that satisfying crunch from the perfectly grilled bread, giving way to a warm, gooey interior.
- Quick and Easy: Despite its gourmet appeal, this melt comes together in a flash, making it ideal for a speedy lunch or a fuss-free dinner.
- Customizable: It’s a fantastic canvas for your culinary creativity! Add your favorite sauces, veggies, or extra cheeses to make it uniquely yours.
- Comfort in Every Bite: There’s something inherently comforting about a perfectly melted sandwich, and this one delivers pure, unadulterated joy.
Table of Contents
Ingredients for Your Dreamy Cheddar Beef Turkey Melt
For the Melt
- 8 slices of your favorite sandwich bread (sourdough, rye, or even a hearty white bread works beautifully!)
- 4 tablespoons unsalted butter, softened
- 1 tablespoon olive oil
- 8 slices sharp cheddar cheese (about 6-8 ounces total, depending on thickness)
- 8 ounces thinly sliced deli roast beef
- 8 ounces thinly sliced deli turkey breast
- 1/4 cup mayonnaise
- 2 tablespoons Dijon mustard
- 1/4 teaspoon garlic powder
- Pinch of black pepper
Optional Add-Ins and Toppings
- Thinly sliced red onion
- Pickle slices (dill or bread and butter)
- Crispy fried onions
- Arugula or spinach for a fresh bite
How to Craft Your Perfect Cheddar Beef Turkey Melt
Step 1: Prepare Your Flavorful Spread
- In a small bowl, combine the mayonnaise, Dijon mustard, garlic powder, and a pinch of black pepper. Stir until everything is well combined and smooth. This spread is going to add a lovely tang and depth to our melt, trust me!
Step 2: Assemble Your Sandwiches
- Take four slices of bread and spread a generous layer of the Dijon-mayo mixture on one side of each. This is your base, building that flavor from the ground up.
- On the other four slices of bread, spread a thin layer of softened butter on one side. This buttered side will be facing outwards when we grill, ensuring that beautiful golden crust.
Step 3: Layer Up the Goodness
- Place one slice of cheddar cheese on each of the four bread slices with the Dijon-mayo spread. The cheese acts as a barrier and helps keep everything together.
- Next, layer about 2 ounces of roast beef evenly over the cheese on each sandwich. Don’t be shy here; we want a hearty melt!
- Follow with about 2 ounces of turkey breast on top of the roast beef.
- Add another slice of cheddar cheese on top of the turkey. This double layer of cheese is key for that ultimate melty experience.
- Finally, place the buttered bread slices on top, butter-side up. Gently press down on each sandwich to compact the layers slightly.
Step 4: Grill to Golden Perfection
- Heat a large skillet or griddle over medium heat. Add the olive oil and let it shimmer. If you’re using a panini press, preheat it according to the manufacturer’s instructions.
- Carefully place two of the assembled sandwiches into the hot skillet, buttered-side down. Cook for 3-5 minutes per side, or until the bread is golden brown and crispy, and the cheese is wonderfully melted and gooey. If you notice the bread browning too quickly, simply reduce the heat slightly.
- For a panini press, place the sandwiches in and cook for about 4-6 minutes, or until golden and cheese is melted.
- Repeat with the remaining two sandwiches, adding a little more olive oil if needed.
- Once cooked, remove the Cheddar Beef Turkey Melts from the skillet. Allow them to rest for a minute or two before slicing diagonally. This helps the cheese settle and prevents all that deliciousness from sliding out.
Substitutes and Variations to Make It Your Own
Meat Alternatives
- All Beef or All Turkey: If you prefer, you can certainly make this an all-beef or all-turkey melt. Just double up on your preferred deli meat.
- Ham: Sliced deli ham can be a delicious addition or substitute for either meat, offering a slightly different salty-sweet profile.
- Vegetarian Option: For a vegetarian twist, try using grilled portobello mushrooms or roasted red peppers instead of meat, paired with your favorite melty cheese.
Cheese Choices
- Provolone or Swiss: These cheeses melt beautifully and offer a milder flavor profile than sharp cheddar.
- Smoked Gouda: For a deeper, smoky flavor, smoked gouda would be an excellent choice.
- Pepper Jack: If you like a little heat, pepper jack cheese will add a wonderful kick to your melt.
Flavor Boosters
- Caramelized Onions: Adding a layer of sweet, slow-cooked caramelized onions will take this melt to an entirely new level of gourmet.
- Bacon: Crispy bacon strips are always a welcome addition to any sandwich!
- Spicy Mayo: Mix a little sriracha or hot sauce into your Dijon-mayo spread for a zesty kick.
- Fresh Herbs: A sprinkle of fresh parsley or chives folded into the spread can add a lovely aromatic touch.
Serving Suggestions to Elevate Your Melt Experience
- Classic Comfort: Serve your glorious melt alongside a warm bowl of creamy tomato soup for the ultimate nostalgic pairing.
- Fresh Side: A crisp green salad with a light vinaigrette makes for a refreshing contrast to the richness of the sandwich.
- Crunchy Companion: A handful of your favorite potato chips or a side of crispy sweet potato fries are always a welcome addition.
- Pickle Power: Don’t underestimate the power of a good dill pickle spear on the side! Its briny crunch cuts through the richness beautifully.
Storing Your Delicious Melts
- While a Cheddar Beef Turkey Melt is truly best enjoyed fresh off the skillet, you can store leftovers. Wrap tightly in aluminum foil or plastic wrap and refrigerate for up to 2 days.
- To reheat, I recommend using a toaster oven or a dry skillet over medium-low heat to help crisp up the bread again. Microwaving might make the bread soggy, and we definitely don’t want that!
- I don’t recommend freezing assembled melts, as the texture of the bread and cheese can suffer significantly upon thawing and reheating.
Maria’s Best Tip for the Perfect Melt
My absolute best tip for achieving that perfect, restaurant-quality melt is all about the heat control. Don’t rush it! Keep your skillet at a consistent medium heat. Too high, and your bread will burn before the cheese has a chance to fully melt into that glorious, gooey perfection. Too low, and you’ll end up with a dry, lukewarm sandwich. Patience, my friends, is truly a virtue when making a melt. Also, a good quality, heavy-bottomed skillet or cast-iron pan distributes heat beautifully, making all the difference in achieving that even, golden-brown crust.
A Hearty Farewell, Until the Next Bite!
There you have it, my friends! The Cheddar Beef Turkey Melt isn’t just a recipe; it’s an invitation to create something truly comforting and delicious in your own kitchen. I truly hope you give this recipe a try and experience the joy of biting into that perfectly grilled, cheese-laden sandwich. It’s a simple pleasure that brings so much warmth and satisfaction. Don’t forget to share your creations with me; I always love hearing about your culinary adventures! Happy cooking, my dears, and enjoy every single savory moment!
Print
The Ultimate Cheddar Beef Turkey Melt: A Comfort Food Dream Come True!
- Total Time: 30 minutes
- Yield: 4 servings 1x
- Diet: Low Lactose
Description
Discover the ultimate comfort food with this incredible Cheddar Beef Turkey Melt recipe! Layers of succulent roast beef and tender turkey, sharp cheddar cheese, and a tangy Dijon-mayo spread, all grilled to golden perfection between slices of your favorite bread. It’s a quick, easy, and utterly delicious meal.
Ingredients
- 8 slices of your favorite sandwich bread
- 4 tablespoons unsalted butter, softened
- 1 tablespoon olive oil
- 8 slices sharp cheddar cheese
- 8 ounces thinly sliced deli roast beef
- 8 ounces thinly sliced deli turkey breast
- 1/4 cup mayonnaise
- 2 tablespoons Dijon mustard
- 1/4 teaspoon garlic powder
- Pinch of black pepper
Instructions
- In a small bowl, combine mayonnaise, Dijon mustard, garlic powder, and black pepper. Stir until smooth.
- Spread a generous layer of the Dijon-mayo mixture on one side of four bread slices.
- Spread a thin layer of softened butter on one side of the other four bread slices.
- Place one slice of cheddar cheese on each of the four bread slices with the Dijon-mayo spread.
- Layer about 2 ounces of roast beef evenly over the cheese on each sandwich.
- Follow with about 2 ounces of turkey breast on top of the roast beef.
- Add another slice of cheddar cheese on top of the turkey.
- Place the buttered bread slices on top, butter-side up. Gently press to compact layers.
- Heat a large skillet or griddle over medium heat. Add olive oil.
- Carefully place two sandwiches into the hot skillet, buttered-side down. Cook for 3-5 minutes per side, or until golden brown and cheese is melted.
- Repeat with remaining sandwiches.
- Remove from skillet, rest for a minute or two, then slice diagonally and serve.
Notes
- For extra flavor, consider adding thinly sliced red onion or pickle slices before grilling.
- Using a panini press will give you beautiful grill marks and even melting.
- Adjust cheese quantity to your liking; more cheese equals more gooey goodness!
- A heavy-bottomed skillet or cast-iron pan works best for even browning.
- Prep Time: 15 minutes
- Cook Time: 15 minutes
- Category: Main Course
- Method: Pan-Frying, Grilling
- Cuisine: American
Nutrition
- Serving Size: 1 sandwich
- Calories: 550 kcal
- Sugar: 5g
- Sodium: 1200mg
- Fat: 30g
- Saturated Fat: 15g
- Unsaturated Fat: 10g
- Trans Fat: 0.5g
- Carbohydrates: 40g
- Fiber: 2g
- Protein: 35g
- Cholesterol: 100mg
Keywords: Cheddar Beef Turkey Melt, beef melt, turkey melt, grilled cheese, comfort food, sandwich recipe, easy lunch, dinner recipe
Frequently Asked Questions About the Cheddar Beef Turkey Melt
Can I use different types of cheese?
Absolutely! While sharp cheddar is fantastic here, feel free to experiment with other melty cheeses like provolone, Swiss, or even a Monterey Jack. A combination of cheeses can also be wonderfully delicious!
What kind of bread is best for a melt?
A sturdy bread that can hold up to grilling and the fillings is ideal. Sourdough offers a lovely tang, rye adds a distinct flavor, and a good quality white or whole wheat sandwich bread works perfectly. Avoid overly thin or soft breads that might become soggy.
Can I prepare the sandwiches ahead of time?
I recommend assembling and grilling the sandwiches right before serving for the best texture and flavor. If you must prepare ahead, you can make the Dijon-mayo spread and slice your ingredients, but assemble and grill just before eating.
What can I serve with my Cheddar Beef Turkey Melt?
These melts are fantastic with a simple side salad, a bowl of tomato soup, or some crispy potato chips or fries. They’re hearty enough to stand alone but pair wonderfully with lighter sides.