
Apple Pie Recipe
Table of Contents
Every kitchen tells a story, and nothing says “home” like the warm, cinnamon-kissed scent of a freshly baked apple pie drifting from the oven. Whether you’re a seasoned baker or just getting your hands doughy for the first time, this apple pie recipe guide is crafted just for you.
In this article, we’ll walk through everything you need to know—from picking the right apples to creating that perfect golden-brown crust. You’ll learn helpful techniques, discover tasty variations, and troubleshoot any baking mishaps along the way. With classic apple pie tips, expert-tested advice, and a few cozy twists, this guide ensures your pie turns out just right, every time.
Ready to roll out some dough? Let’s dive into the first slice of knowledge.
Choosing the Right Ingredients for Your Apple Pie Recipe
Best Apples for Apple Pie Recipes
Let’s be honest—apples can make or break your pie. The key is choosing the right blend. Tart apples like Granny Smith are firm and don’t turn mushy when baked. They offer that sharp bite that balances well with the sugar. Want a more complex flavor? Mix in some sweeter varieties like Honeycrisp or Braeburn to add depth.
Using a mix of apples keeps the flavor bold and the texture satisfying. That’s why so many apple pie recipe enthusiasts swear by this combo. Just steer clear of Red Delicious—they break down too easily and can make the filling soupy.
The Role of Sugar: White, Brown, or Both?
Now, sugar—here’s where the magic happens. While white sugar brings sweetness and structure, brown sugar offers a warm, molasses-like richness. Most trusted apple pie recipes use both. The combination boosts flavor and helps the filling caramelize just right.
Don’t go overboard though. Let the apples shine. After all, they’re the star of the show.
Butter, Flour, and Spices: Creating Depth of Flavor
Every great filling starts with butter. It creates that rich, velvety base when melted with flour. This combo thickens the syrup that wraps around the apples. Then, add cinnamon, nutmeg, and a pinch of salt. These simple pantry staples work wonders to enhance flavor.
Store-Bought vs. Homemade Pie Crust
Not a crust pro? No judgment here. A quality store-bought double crust can work like a charm. But if you’ve got time, homemade crust offers unbeatable flakiness. Either way, make sure it holds up and bakes golden.
Step-by-Step Apple Pie Recipe

Preparing the Pie Dough
If you’re making crust from scratch, start cold. Cold butter, cold water, and even a chilled bowl help keep the fat from melting too soon. Cut the butter into the flour until the mix looks like coarse crumbs. Add ice water a little at a time, just until the dough holds together.
Form it into two discs, wrap them in plastic, and chill for at least 30 minutes. If you’re using a store-bought crust, simply let it thaw per package directions.
Peeling, Slicing, and Seasoning the Apples
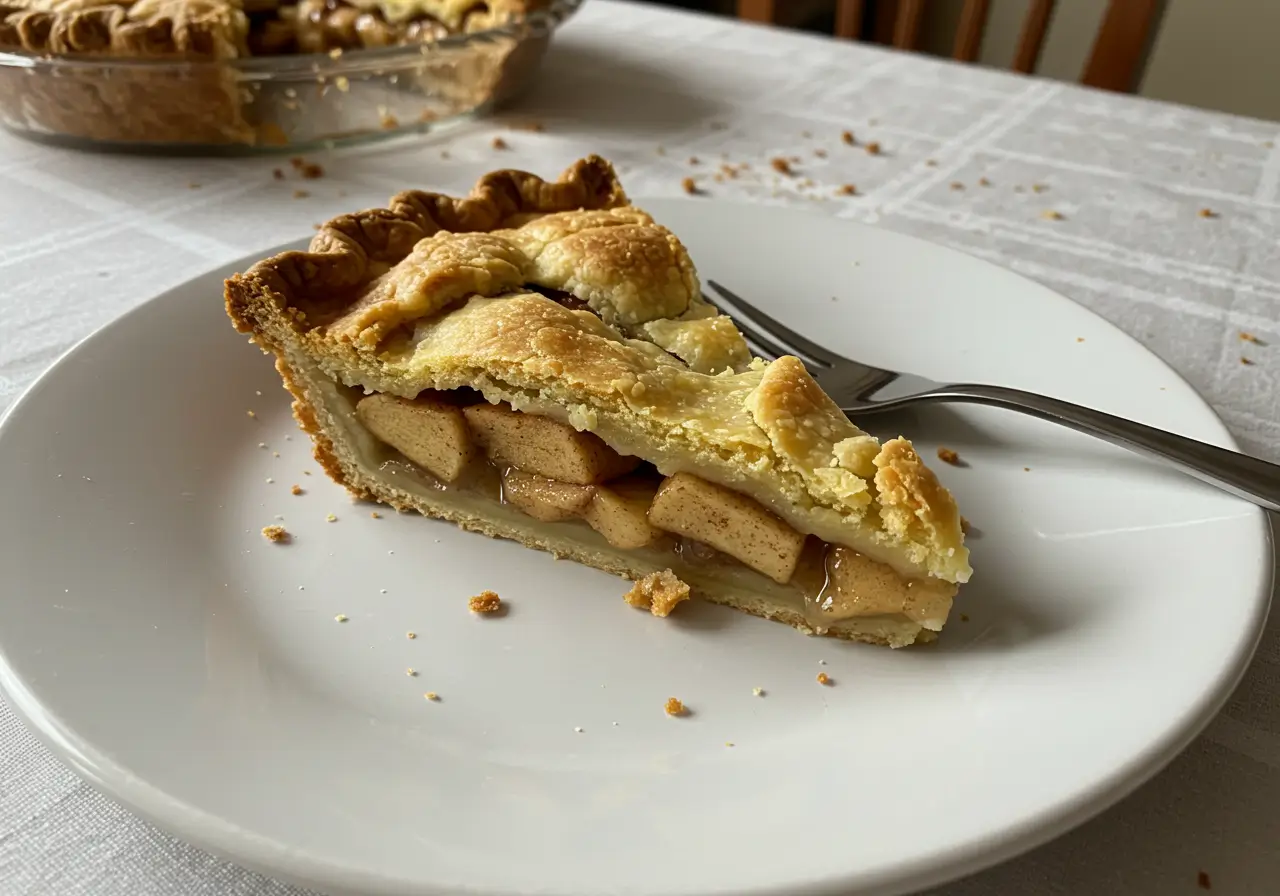
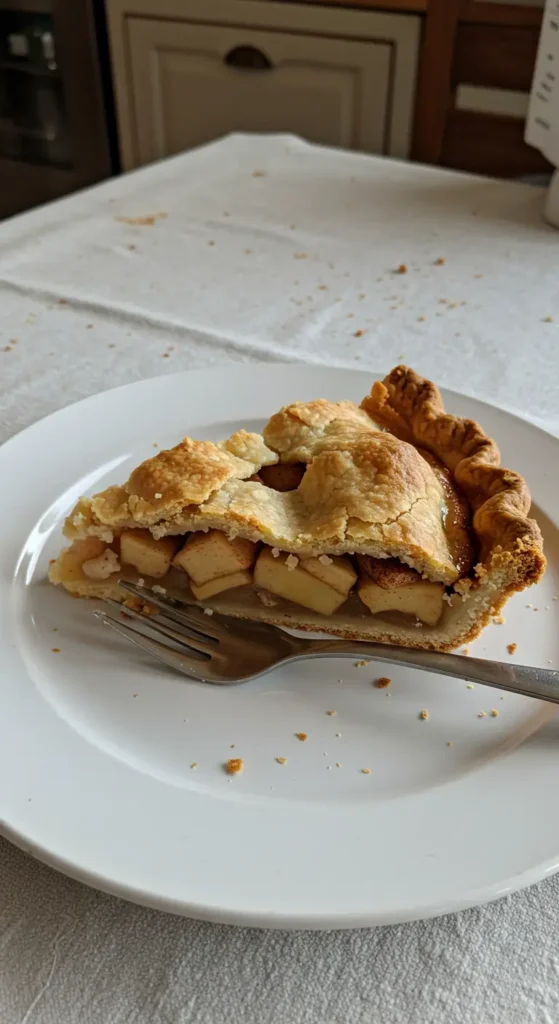
Once you’ve picked your perfect apples, peel and core them. Slice them evenly—about 1/4-inch thick is ideal. Too thick, and they won’t cook through. Too thin, and you’ll end up with mush.
Toss the slices in a bowl with your spice blend, a squeeze of lemon juice, and a dash of flour. The lemon keeps the apples from browning and adds brightness. The flour helps thicken the juices during baking.
Creating a Lattice Top or Traditional Crust
For a traditional look, simply roll out your top crust and lay it over the pie. But if you’re feeling fancy, go for a lattice. Cut strips about 1-inch wide. Lay half across the pie, then weave the rest over-under style. It’s easier than it looks—and totally worth it.
Brush the top with a bit of milk or beaten egg for that beautiful golden shine.
Assembling the Pie Like a Pro
Place one crust into your pie plate. Press it gently into the bottom and up the sides. Add your seasoned apple slices in a small mound—the apples will shrink a bit as they bake.
Once the top crust is in place, trim any overhang and crimp the edges. Make sure there are small vents if you’re not using a lattice. This lets steam escape and keeps the filling from bubbling over.
Baking Instructions and Temperature Guide
Preheat your oven to 425°F (220°C). Bake the pie for 15 minutes at this high heat—it sets the crust. Then, lower the temperature to 350°F (175°C) and continue baking for 35 to 45 minutes.
You’ll know it’s done when the crust is golden and the filling is bubbling through the vents. Let it cool for at least two hours before slicing. That gives the juices time to thicken—and makes it easier to serve.
Expert Tips for Perfect Apple Pie Every Time
Preventing a Soggy Bottom
Ever cut into a pie and found a wet, doughy mess underneath? Yep, we’ve all been there. But don’t worry—this fix is easy. Bake your pie on the lowest oven rack. That extra heat helps firm up the bottom crust. You can also brush the base with egg white before adding the filling. It forms a barrier that keeps it from going soggy.
How to Thicken the Filling Naturally
No one wants a pie that oozes like soup. To avoid that, make sure your apple slices are evenly coated in flour or cornstarch. These ingredients absorb extra juice as the apples cook. Also, don’t skip cooling time! Letting the pie rest allows the filling to set.
Avoiding Overbaked or Undercooked Crust
It’s a balancing act, for sure. Start your apple pie recipe with high heat (425°F) for the first 15 minutes. Then reduce to 350°F. This trick crisps the crust without burning it. If the top browns too fast, loosely cover it with foil.
Golden Color Without Overbrowning
For that golden bakery finish, lightly brush the top with milk or egg wash. Sprinkle with sugar if you’re feeling fancy. Just keep an eye on it during the last 10 minutes.
Apple Pie Variations You Can Try
Dutch Apple Pie with Crumb Topping
Want a cozy twist? Try a Dutch-style apple pie recipe. Instead of a top crust, you’ll add a buttery crumble made with brown sugar, oats, and cinnamon. It bakes up crispy and golden—pure joy in every bite.
Caramel Apple Pie Twist
Add a swirl of homemade caramel over your apple filling before baking. The result? A gooey, rich pie that feels like fall wrapped in a forkful. It’s sweet, sticky, and irresistibly good.
Mini Apple Hand Pies for Gifting
These are perfect for holidays or casual get-togethers. Just cut circles of pie dough, add a spoonful of apple mix, fold, and seal. Bake until golden and you’ve got apple pie to-go. Kids love ’em too!
Sugar-Free or Gluten-Free Apple Pie Options
Watching sugar or gluten? You’re still in the pie game! Swap in monk fruit sweetener or maple syrup for sugar, and try a gluten-free flour blend for the crust. You’ll still get all that warm, spiced flavor without sacrificing texture.
For more delicious recipes, check out our carrot cake recipe. It’s another crowd-pleasing dessert perfect for holidays or cozy nights in.
Serving and Storage Tips for Apple Pie
Pairing Apple Pie with Ice Cream or Cheddar
Now that your pie is fresh out of the oven, what’s the best way to serve it? Warm with a scoop of vanilla ice cream is the classic. The cold cream melts into the warm filling—pure bliss. Want to try something old-school? Pair it with a thin slice of sharp Cheddar cheese. It may sound odd, but the salty bite works wonders with sweet apples.
This apple pie recipe is flexible, so don’t be afraid to mix it up. You can even drizzle some caramel or sprinkle crushed pecans on top for extra flair.
Storing at Room Temperature vs. Refrigeration
If there’s any left (hey, it happens), let the pie cool completely. Cover it with foil or plastic wrap. You can keep it at room temperature for up to two days. After that, pop it in the fridge. There, it’ll last another 2–3 days and still taste great when warmed up.
Can You Freeze Apple Pie? How to Do It Right
Yes, you can freeze it! Wrap the fully cooled pie in plastic wrap and then in foil. Store it flat in the freezer for up to three months. To reheat, bake at 350°F until warmed through. It’ll taste almost as good as fresh.
Apple Pie Recipe Reviews from Real Bakers
User Testimonial Highlights
Don’t just take our word for it—real bakers love this apple pie recipe. One reviewer wrote, “After 40 years of baking, this pie finally got my family to stop buying the store version!”
Another added, “It’s a hit at every holiday. I’ve made it five times already, and it vanishes in minutes!”
Common Praise and Suggestions
Most readers rave about the caramelized filling, calling it rich and balanced. Many also love the flaky crust and the fact that it holds its shape well when sliced.
Some folks like to tweak the spices—adding clove or allspice for more punch. Others recommend brushing the crust with heavy cream instead of milk for a deeper color.
Lessons from the Community
The best part? This recipe inspires confidence. Even beginners say they nailed it on the first try. So if you’re nervous, don’t be. You’re not baking alone—there’s a whole pie-loving crew cheering you on.
Print
Apple Pie Recipe
- Total Time: PT1H30M
- Yield: Serves 8
- Diet: Vegetarian
Description
This classic homemade apple pie recipe features a flaky golden crust filled with tender, cinnamon-spiced apples. Perfect for holidays or family gatherings, it balances sweet and tart flavors with a comforting, old-fashioned touch.
Ingredients
- 8 small Granny Smith apples, peeled, cored, and sliced
- 1/2 cup unsalted butter
- 3 tablespoons all-purpose flour
- 1/2 cup white sugar
- 1/2 cup packed brown sugar
- 1/4 cup water
- 1 (9-inch) double-crust pie pastry, thawed
Instructions
- Preheat oven to 425°F (220°C).
- Melt butter in a saucepan over medium heat. Stir in flour to form a paste and cook for 1–2 minutes.
- Add white sugar, brown sugar, and water. Bring to a boil, then reduce heat and simmer for 3–5 minutes. Remove from heat.
- Place one pie crust into a 9-inch pie pan and press into the bottom and sides.
- Fill the crust with sliced apples, slightly mounding in the center.
- Create a lattice top with the second crust. Carefully pour the sugar-butter mixture over the lattice and let it seep through.
- Bake for 15 minutes at 425°F, then reduce heat to 350°F (175°C) and bake for another 35–45 minutes until golden and bubbling.
- Let cool for at least 2 hours before serving.
Notes
- Mix tart and sweet apples for richer flavor.
- Brush the top crust with egg wash for a golden finish.
- Let the pie cool completely before slicing to set the filling.
- Store leftovers at room temperature for 2 days or refrigerate for up to 4 days.
- Prep Time: PT30M
- Cook Time: PT1H
- Category: Dessert
- Method: Baking
- Cuisine: American
Nutrition
- Serving Size: 1 slice
- Calories: 373
- Sugar: 32g
- Sodium: 124mg
- Fat: 19g
- Saturated Fat: 9g
- Unsaturated Fat: 8g
- Trans Fat: 0.5g
- Carbohydrates: 52g
- Fiber: 3g
- Protein: 2g
- Cholesterol: 31mg
Keywords: apple pie recipe, homemade apple pie, classic apple pie, easy apple pie, best apple pie, apple dessert recipe, holiday dessert
FAQ About Apple Pie Recipes
What apples are best for an apple pie recipe?
Tart apples like Granny Smith are the gold standard because they hold their shape and balance the sweetness of the filling. For extra flavor, mix them with sweeter apples like Honeycrisp, Braeburn, or Fuji.
Should you cook apples before putting them in pie?
Not usually. In most traditional apple pie recipes, the apples are added raw and bake inside the crust. But some bakers like to pre-cook the filling slightly to reduce moisture and ensure tenderness. Either method works—just don’t overdo it!
How do I keep the bottom crust from getting soggy?
Bake the pie on the lowest oven rack and preheat a baking sheet underneath to help crisp the bottom. Brushing the bottom crust with egg white before filling can also create a barrier to moisture.
Can I freeze my apple pie?
Yes! You can freeze the pie before or after baking. Just wrap it tightly in plastic and foil. When ready to enjoy, bake or reheat at 350°F until warm.
How long does apple pie last?
At room temp, it’s good for up to two days. In the fridge, it stays fresh for 3–4 days. Frozen pies can last up to 3 months.